| Introduction Imbued with shamanistic and demonic powers, Strygwyr is able to replenish his health with the lives he takes, as well as sense weakened souls which allow him to go into a blood frenzy, increasing his movement speed so he can chase down the enemy; if the hunted attempts to escape, Strygwyr will curse him to lose health if he moves. Up close and personal, the Bloodseeker can empower himself to almost double his damage, becoming on par even with the toughest fighters. Pros and Cons Pros: - high base damage (2nd highest among agility heroes) - high starting str 23 (among agility heroes) - good jungler/laner with Blood Bath - good chaser and unjukable with Thirst Cons - no stun - no nuke - melee - easily counter by TP scroll |
Quote:
| Skill Build 1. Blood Rage 2. Blood Bath 3. Blood Bath 4. Strygwyr's Thirst 5. Blood Bath 6. Rupture 7. Strygwyr's Thirst 8. Strygwyr's Thirst 9. Stats 10. Stats 11. Rupture 12. Stats 13. Stats 14. Stats 15. Stats 16. Rupture 17. Stats 18. Stats 19. Stats 20. Stats 21. Blood Bath 22. Strygwyr's Thirst 23. Blood Rage 24. Blood Rage 25. Blood Rage Skill Build Justification: 1 > Blood rage at lv1 for the 6 seconds silence and 120 damage 'nuke' 2 > Skill Blood Bath at lv2, 3 and 5 early to help with laning. 3 > 1 lv of Thirst at lv 4 for chance of early first blood attempt. 4 > This build focus on Blood Rage is use solely for the silence. The skill is remain at lv1 almost throughout the whole game. Since the nerf additional lv in Blood Rage only increase the duration by 1 seconds. 5 > Thirst only skill to lv 3 early because the Item build has Yasha which provide 10% ms. Yasha(10%) and lv 3 Thirst (33%) provides 43% ms. Resulting in total MS with Treads 365 + 365*43% = 522 ms. 6 > Rupture is skilled whenever possible. 7 > With this build, Strygwyr will have 6 skills of stats by lv16 providing +12 to all stats. 8> Do not underestimate Stats. This is almost equavalent to some Heroes' Ultimate which provides Stats *hint*centaur*hint*drow*hint*. |
Quote:
| Item Build Quote:
|


 -
-  -
-  -
-  -
-  -
-  -
-  -
-  -
- 


Quote:
| Game Play Quote:
Quote:
Quote:
|
Quote:
Lv25 Strygwyr
 Before We Begin: Ah, yes. Bone Fletcher. He's been around since the early stages of DotA, and has been relatively unchanged and untouched ever since. A lot of people probably started off playing him, before moving on to other heroes. I know I did. This guide is for newbie players and pro players alike, so don't be shy to be reading this no matter what gaming experience you have. Table of Contents: 1. Hero Breakdown -1.1: General Statistics -1.2: Miscellaneous -1.3: Skills -1.3.1: Skill Tree -1.4: The Good and the Bad -1.5: Roles in Battle 2. The Three Phases of Gameplay -2.1: Early game -2.1.1: Item purchase -2.1.2: Gameplay -2.2: Mid-game -2.2.1: Item purchase -2.2.2: Gameplay -2.3: End-game -2.3.1: Item purchase -2.3.2: Gameplay 3. Habits of a Good Fletcher 4. Allies and Enemies -4.1: Allies -4.2: Enemies 1. Hero Breakdown 1.1 General Statistics Strength: 15 + 1.6 Agility: 22 + 3 Intelligence: 16 + 1.55 HP (at start): 435 Mana (at start): 208 Damage (at start): 37-43 Armor (at start): 2.1 Attack range: 600 1.2 Miscellaneous Background Story: The fire that kindles eternally on the visage of the fallen Elven Archer proves to others that his undeath was a mere genesis. Clinkz seeks perfection in the arts of fletching and never hesitates in sacrificing his own allies for the cause. Still retaining his ability to move with the wind, he is ready to slay the enemy officers with his swiftness and precision in archery. The Fletcher fires arrows that scorch the target with the heat of the Underworld, bringing them closer and closer to their peril. An elvish archer in life, a nightmare in death. Other names for Bone Fletcher: bf, clinkz, bone, fletcher 1.3 Skills  Strafe Fire a large amount of arrows in a short time period. 90% increased attack speed. Level 1: Lasts 4 seconds. Level 2: Lasts 6 seconds. Level 3: Lasts 8 seconds. Level 4: Lasts 10 seconds. Manacost: 90 Cooldown: 60/50/40/30 Notes: This is, at mid-game till endgame, your killer skill. It allows you to fire 90% faster for a whopping 10 seconds, for no penalty at all, for just 90 mana. There is no casting animation, therefore it can be triggered without any delay. Note that despite what playdota has stated on the site, there is NO animation on Bone Fletcher when Strafe is activated, at least none that I have seen. The only clue of whether or not this skill is active on your hero is only on the status bar, where a shimmering icon of Strafe can be seen, so be careful of when it disappears. Despite popular, contrary belief, this skill is NOT required in your early game stats. I will explain, later.  Searing Arrows Increases the damage of the Hero's attack by adding fire. Level 1: Additional 20 damage Level 2: Additional 30 damage Level 3: Additional 40 damage Level 4: Additional 50 damage Manacost: 8 Cooldown: 2/0/0/0 Notes: Searing Arrows is the best farming tool you have in your arsenal in early game. With practice and a good sense of projectile movement, last hits will always be yours with this handy skill. Ever since they buffed the skill in 6.66, you have no cooldown at all starting from hero level 3. This is wonderful news, and abuse it to ascertain your victory. Note that Searing Arrows deal physical damage. Armor reduction is considered in the final damage calculation. This makes your best targets to be most Intelligence heroes and a select few Strength heroes, because they have not much armor to speak of. Agility heroes will be less affected by this due to the fact that they have naturally high Agility gains, and therefore naturally higher armor. Not that this should stop you from harassing them. ***Thanks to everyone who pointed this fact out to me in the first edition of this guide. Sorry about that.*** Another note about this spell is that when manual casted, it counts as a SPELL. Therefore, you CAN attack when Frostbitten/Overgrowthed/Decryptified, simply by manual casting Searing Arrows. Interestingly enough, this does not work if Pugna casts Decryptify on himself.  Windwalk Turn invisible for a period of time, increasing movement speed. Level 1: Lasts 20s, increases movespeed by 10% Level 2: Lasts 25s, increases movespeed by 20% Level 3: Lasts 30s, increases movespeed by 30% Level 4: Lasts 35s, increases movespeed by 40% Manacost: 75 Cooldown: 20s Notes: This skill is officially your best friend. Ever. With just Power Treads and a Level 4 Windwalk activated, you have a movespeed of 504. That's faster than most heroes can ever achieve. Not only that, you turn invisible and you gain 0 unit collision (meaning you pass through other units). Therefore, this means that they can buy all the truesight they want, but if they can't catch you it's meaningless. As with most invisibility, doing anything breaks the Windwalk effect on you. This includes casting spells and attacking. Take note that even attempting to attack will break Windwalk. In my experience, it is possible to cancel an attack before invisibility is broken. This is done by cancelling the attack animation just before Fletcher releases his arrow. This means that Fletcher can reach back, draw an arrow and nock his bow, and you can still cancel it. This gets progressively harder to do as your attack speed increases.  Death Pact Kills target unit, regaining a percentage of its life. Level 1: Converts 50% of HP of target to health Level 2: Converts 100% of HP of target to health Level 3: Converts 150% of HP of target to health Manacost: 100 Cooldown: 20 Notes: This skill, being your ultimate, is a bit of a letdown after all the attack based skills you have in the previous 3 skill slots, but never underestimate the power of Death Pact. Ever since an upgrade in 6.6x (I forget), Death Pact has not only been able to be casted on Neutral and Allied creeps, but on Enemy creeps as well. This is a critical issue, but I will explain that later. This skill is what keeps you in lane for so long, and will be the source of your HP in early game through mid game. Note that any enemy or neutral creeps you Death Pact (commonly referred to as "eating") will count as a creep kill, and you gain EXP and gold for doing it, while any allied creeps you "eat" will count as a deny and any enemy heroes in range will naturally gain less EXP from that creep. Also, Death Pact converts a percentage of the creep's current health, not maxhealth. Keep this in mind when selecting creeps to cast this on. 1.3.1 Skill Tree This is my recommended skill tree for the Bone Fletcher. Note that this is OPTIONAL, and the guide does not STRICTLY require you to learn the following skills in the exact same order as what I am writing down here. You are free to experiment to which skills learned when suits you the most, and this is the one I'm most comfortable with. Please note, however, that Searing Arrows should be maxxed out as your first skill, as only an insane player would not max out your best early game skill first. Level 1: Searing Arrows/Windwalk* Level 2: Searing Arrows/Windwalk* Level 3: Searing Arrows Level 4: Stats Level 5: Searing Arrows Level 6: Death Pact Level 7: Searing Arrows Level 8: Stats Level 9: Stats Level 10: Strafe Level 11: Death Pact Level 12: Strafe Level 13: Strafe Level 14: Strafe Level 15: Windwalk Level 16: Windwalk Level 17: Windwalk Level 18: Stats/Death Pact** Level 19: Stats Level 20: Stats Level 21: Stats Level 22: Stats Level 23: Stats Level 24: Stats Level 25: Stats/Death Pact** Rationale: All right, here's the breakdown on the skill tree. Note that at level 1, I placed a * to mark it. This is because you should NOT learn any skill at all at the very beginning of the game. It is not uncommon for people to attempt a First Blood via ambush or simply sending 3 people to a single lane for it. In this case, you do NOT want to be a Level 1 Bone Fletcher with Searing Arrows as your only skill. Therefore, before inputting any skill points into any skill at level 1, take stock of your surroundings and who you're facing, then decide. QUESTION! Why no Windwalk, or Strafe? In the very early game, Bone Fletcher does not require much more than a Level 1 Windwalk, mainly because it is extremely unlikely that you will require the extra movespeed to give chase to another person for that last hit, provided they are decent players of any sort. In fact, Windwalk will mostly be required only to enter invisibility for that precious few seconds to escape imminent death, where you can regroup at your tower or go back to your fountain for healing. Therefore, waste not stat points in Windwalk. The same theory goes for Strafe, although for a different reason. In the very early game, you have no need for Strafe. Sure, you gain extra 90% attack speed for 4~6 seconds, but with that kind of damage it's not going to make much of a difference. Searing Arrows is powerful, yes, but in the early stages when it's still at Level 1 or 2, it's basically just a minor upgrade to your damage. Your attack speed isn't all that fantastic either, so an extra 90% won't amount to much, maybe 2 or 3 extra arrow hits or low to medium damage. With a 90 manacost, you can hardly afford that in early game. The Bone Fletcher's weakness is fragility. With a starting HP of less than 500, you're easy food for any powerful nukers that will go your way. Therefore, you need some outside assistance, namely, stats. Don't input skill points into Strafe and Windwalk in early game; they're not all that useful. Go for some stat points instead; don't scoff at the 38 HP. It just might save your bony behind in a pinch. That was a little long, but I wanted to go into detail. Next section. 1.4 The Good and the Bad There are many upsides and downsides to playing any hero in DotA, and Bone Fletcher is no exception. Here's a summary. THE GOOD: -Best invisibility in the game. Longest duration with a relatively short cooldown, and a whopping great movespeed modifier to boot. -Only orb effect in game that can damage buildings. Manual castable on buildings, which will make them ignore you (Unless you're the only unit in range). Cheapest orb, too. -High damage due to Searing Arrows lets you farm VERY easily, and gives you access to powerful lane control. -Very high damage output THE BAD: -Highly fragile in terms of HP -Extremely mana-intensive for an Agility hero with low Intelligence gain -Lack of nuke makes it hard sometimes to kill 1.4 Roles in Battle After highlighting all that, I think it's pretty clear to everyone that the Bone Fletcher was designed specifically to be the DPS of the group. He is a hero that needs protection, all the way till he grows strong enough to fend for himself, and even then he requires good support from his team to pull through. When in a major clash, avoid being in the center of everything. You're not meant to be there. Much like Sniper/Drow Ranger, stay on the outside of the battle and keep those Searing Arrows flying. Pick out those you can easily take down in a few shots, and reduce their number from 5 to 4 heroes as soon as you can. Leave the disabling to your team, and concentrate your fire on one guy to take him down fast. Before clashing, try to stay behind, but not behind your team, behind theirs. That's where the support heroes usually hang out, letting their tanks do their job of taking all the hits. This can be accomplished easily via Windwalk and smart usage of the forest. This also puts you out of the way of all those AOE ultimates like Echo Slam and Chain Frost, leaving you relatively unharmed by the nukes of the enemy team. Note that if the enemy has true sight, it would be unwise to hang around an area where they can see you, so make sure you check them for Gem/Dust/Wards first. 2. The Three Phases of Gameplay 2.1 Early Game 2.1.1 Items Note that these items are assuming you picked Bone Fletcher, not randomed him.   At game start, you should have enough cash on hand to purchase 2 Circlets of Nobility and 2 sets of Tango of Essafication. You will need a lot of circlets later on, so head out there and start farming.   As stated earlier, the Bone Fletcher is not exactly very strong in the HP department. Therefore, to remedy this situation, go for Wraith Bands. One Wraith Band costs 460 gold apiece. Mass them, for they are your source of HP, damage and mana for your early till mid game. Purchase four of them if you can, but if you can't farm out 4 Wraith Bands, make sure you have at least 3. A lot of people choose to forego these awesome items and go straight for stuff like Demon Edge and Eaglehorn, but that is folly. Four Wraith Bands provide you with 228 HP, 24 damage, 24% attack speed and 156 mana. These stats are what will help you survive your early game well. Note that as and when you can, purchase items using your Circle of Power. Do not wait till you have to go back to base to buy these items, just in case you die and lose the gold. Common sense, but I thought I'd say it anyway. Treads can be wholly made at the side shops, but if you're in mid lane then form Treads with your Circle too. 2.1.2 Gameplay Your job in early game is not to kill, but to farm and survive. Therefore, concentrate your energy on making sure that you get most, if not all of your last hits. This is made easier by the presence of Searing Arrows. When you're not trying for a last hit, do NOT, I repeat, do NOT attempt to attack the creeps to lower their HP. This not only gives the enemy chance to deny you, but also makes your creeps push that much faster towards the enemy tower. You do not want that. As much as possible, stick to your own tower. This is not to say that you should spend your time idling away while waiting for last hits to pop up in front of you. Once you reach level 3, start manual casting Searing Arrows on the enemy heroes. This is a pain, as they have no real way of hitting you back without causing your creeps targeting them. Abuse this to your heart's content, just ensure that you remember to get your last hits. When faced with an undesirable situation, for example you're 1 hero facing 2, go for a more defensive approach. Remember, survival. It doesn't work out in your favour if you get a kill just to be killed off by the second hero, because the only real guy who benefits is the second hero who killed you. Stick to purely last hitting and denying creeps, and try to bring the waves as close to your tower as you can so you can hug and farm at the same time. If they come to harass you, throw them a couple of Searing Arrows right back, if you know you can get away with just a few scratches. Don't let them think they can harass you for free all the time, or they'll be doing it so often you won't farm at all. Prevention is better than cure, after all. Always ensure you have 75 mana left in your mana pool to cast Windwalk. The moment you spot danger of any kind coming your way, get ready to press that W button. The moment an enemy hero appears, or you suspect a hero is going to make his appearance, turn invisible and wait things out first. Again, survival is key. In some games, you will encounter people who purchase Sentry Wards in the early levels, say 3~4. This should not be likely because you shouldn't be casting Windwalk much, but you will find some paranoid people around. When they do, continuously check their inventory, and watch for when the ward count goes down. This means they have planted a ward. You now know the general area of the ward, and when it will expire. Keep these in mind and play cautiously until the ward expires. After you reach level 9 or so, you should have your 4 Wraith Bands and Power Treads ready and waiting. At this point, early game is over for you, and you enter mid game. 2.2 Mid game 2.2.1 Items  OR  The first damage element in your item build. Go for the damage first, so you can start killing people. Depending on which you got, form either an MKB or a Butterfly. 2.2.2 Gameplay The start of mid game is more or less the same of your early game. Farm, farm and farm some more. Unless your team is feeding so badly in the other lanes that you have to do something about it, ignore them and go in with your life in your chosen lane, but be more alert for incoming ganks, as in mid game people will tend to gank more and more. Pay attention to the minimap, and when your ally says that an enemy is missing, start being cautious. Stay away from the river side, and hug your tower if you think is necessary. Once you farm out your first damage item, either Demon Edge or Eaglehorn depending on the situation, start becoming aggressive. Abandon your lane of choice and start hunting people down. This should be around level 13, 12 if your farming was exceptionally good. Employ the help of your team mates, and don't feel bad about taking the last hit from hero kills, because you really do need that cash. Target low HP heroes, mainly the support and the DPS, and you should be able to take them down within 6-8 hits by yourself. When a tower falls, try to get within 1000 radius of it; you get extra gold just by being there. If all goes well, you will get Butterfly/MKB by level 15 or 16, and that's when you start owning the game proper. 2.3 End game 2.3.1 Items Now that you've reached this point, you should pretty much be owning the game. In the case where you aren't, consider going for a BKB to offset those pesky nukes that are killing you off before you can kill THEM off. Or get a Buriza for that extra damage, or a Satanic for that matter, because Searing Arrows loses it's effectiveness nearing the end game. However, there is one item on the list that you HAVE to get, and that is this.  Orchid Malevolence. This baby gives you more damage, more attack speed, a 5 second silence so that stupid QOP can't blink away, but most important of all, 225% mana regen. You need this. As stated before, Bone Fletcher is a VERY mana intensive hero. Every last one of his skills is active, and Strafe isn't helping much since it means you're depleting your mana pool faster. Once your mana's gone, well, there goes your ability to Windwalk and heal, and chances are there goes your life too. With an Orchid Malevolence in hand, you can more or less turn Searing Arrows on and leave it on, provided you don't keep casting Strafe. Your mana goes up, and so does your chance of survival too. 2.3.2 Gameplay Basically, you are the killer now. Da MAN. But do not fall into the trap of thinking that you are all-powerful; three heroes with good nukes and stuns can still tear you apart like a rag-doll. Pick off stragglers as and when you can, stick with your team and perform ganks, and when pushing as a team scout ahead and in the forest with your invisibility. Just be careful of any truesight they might have. 3. Habits of a Good Fletcher A) Always ensure that at all times, you can cast Windwalk. This not only entails keeping a sharp eye for enemy heroes, but also making sure that before you exit Windwalk to attack an enemy, your cooldown is over. Windwalk lasts 35s while its cooldown is 20s. It is therefore possible to pop out, ambush an enemy, then disappear before they realize you were hitting them again. Never ever exit Windwalk before your cooldown is done, unless you are ABSOLUTELY sure that you can get away with it. B) Abuse the fact that you have a castable orb effect. Especially in the early game, "orb-walking", as I term it, can be very helpful. There are many names for this procedure, I believe. For those who don't know, "orb-walking" is done as follows. Using the Searing Arrows hotkey (R), manual cast on the enemy. Once the arrow leaves your bow, immediately start walking towards the enemy, canceling any waiting time for your attack cooldown. Once you're sure you can fire again, repeat the process. This not only bypasses enemy creep aggro, but also helps you to keep within range of the target, should he run away from you. C) Keep an eye out for True Sight on the enemy team. I cannot stress this enough. Whenever you see a hero for the first time after a period of time, check his inventory. Just a cursory glance will do; just to make sure he has no dust/gem/sentry wards/Necronomicon level 3. If you see any of these items, stay FAR FAR away from them, or wait for an ally to initiate a gank before you go in. Never ever attempt to kill a hero with true sight, because you can't know where his allies are. Who knows but that Shadow Shaman is lurking somewhere waiting to turn you into a chicken? D) Know when and how to break Windwalk. This might seem to be a simple matter of attacking someone, but it is important to choose a location to do it as well. Here are some screenshots to show you an example.
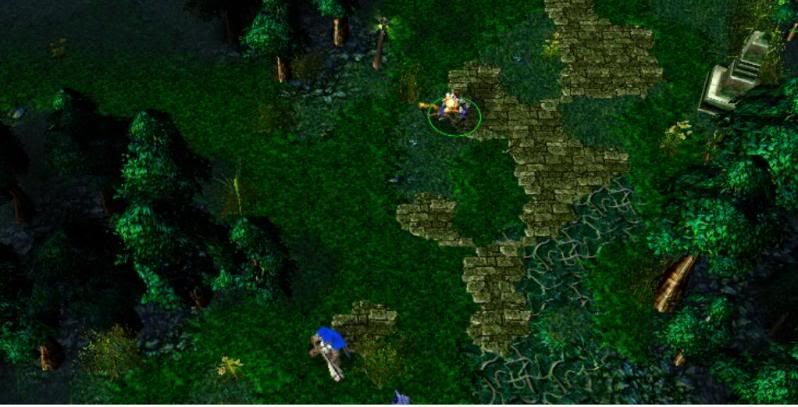 This is example of Bone Fletcher ambushing Dwarven Sniper at the bottom Sentinel first tower. As you can see, Fletcher is attempting to cut off Sniper's back route and pin him against the tower, but if you were Sniper, would you REALLY run backwards through Fletcher, or attempt to escape through the left via the forest? Chances are, Sniper will attempt to use the forest to his advantage, and Fletcher's chances of killing Sniper lowers considerably due to blasted Fog of War.
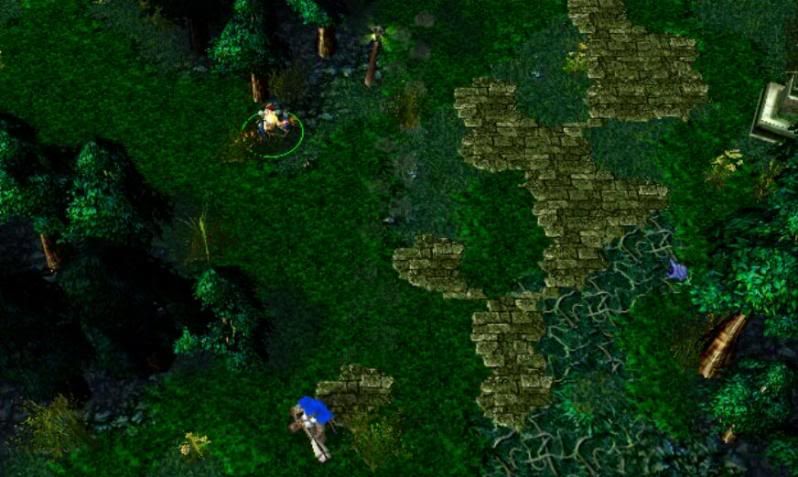 This is the same example, taken in the same place with the same settings. By positioning himself halfway across both routes, Sniper will be forced to run through Fletcher's range either way. In many cases, you will have only one chance to kill a hero; don't waste it by putting yourself in a bad spot. E) This is a point many Fletcher players overlook. Death Pact has -no- requirement on casting, save that there be a creep around you before you can cast it. Therefore, when you're duking it out with an enemy hero mano-a-mano, do not forget about this spell. Many people neglect the existence of this spell and end up paying with their lives for it. Before you decide that a battle's lost and you attempt to Windwalk, try "eating" a creep first, and see if that turns the tide in your favour. Of course, before doing so, ensure you will still have mana to Windwalk. Rule number 1 still applies. 4. Allies and Enemies 4.1 Allies Basically, any good ally you have would be support based. Stuns, nukes, damage amplifiers, silence, the works. Stick to these bosom friends of yours, and remember to thank them after you grab all the kills. Disablers   Basically, heroes like these are your best friends. Damage amplifiers    Heroes like these help to boost your attack damage. It's always good to have heroes like these on your team, because they help you to kill that much more efficiently. 4.2 Enemies   These two heroes are your mortal enemies in early game, simply because of Mana Burn and Mana Break. Fletcher NEEDS his mana in early game, because without that golden 75 mana to windwalk with he's just food waiting to be eaten. These two stop you from doing that, and subsequently own you in the process.   Heroes like these have one point in common, and that is silence. Once you're silenced, it means no spells, no windwalk, no Death Pact, no life. You're almost always dead when Doom Bringer casts Doom on you, because you can't do anything but try to run. Keep an eye out for these heroes. Note: Searing Arrows does not trigger Last Word, but also does not remove Curse of the Silent. End of the Road Well, it seems we're done here. I've listed all my expertise from playing this hero, and the rest is up to you. At the end of the day, everything still stems from practice and experience. I hope you found my guide useful. Good luck to you, and GL HF!ottom-width: 0px; border-color: initial; border-image: initial; border-left-width: 0px; border-right-width: 0px; border-style: initial; border-top-width: 0px; line-height: 1.5; margin-bottom: 0px; margin-left: 0px; margin-right: 0px; margin-top: 0px; padding-bottom: 0px; padding-left: 0px; padding-right: 0px; padding-top: 0px;" width="556" /> |
No comments:
Post a Comment